These Homemade Bounty Bars Recipe are incredibly easy to whip up with just 3 simple ingredients! Follow my step-by-step guide and enjoy making this popular candy bar right in your own kitchen!
Make your own Homemade Bounty Bars with just 3 simple ingredients! Follow my easy step-by-step instructions to recreate this popular candy bar at home.
It’s Friday! Time to treat yourself after a long week, and I’ve got the perfect recipe. With only chocolate, sweetened condensed milk, and shredded coconut, you’ll have delicious Homemade Bounty Bars (or Mounds) in no time.
Want classic Bounty Bars? Use milk chocolate. Prefer Mounds? Just swap in dark chocolate! Making these candy bars from scratch couldn’t be easier.

How I make homemade Bounty Bars Recipe:
The coconut filling:
I start by whisking together the coconut oil and -milk. I whisk until it is fully incorporated. Once it is one homogenous mass, I mix in the sweetener, salt and vanilla. I whisk some more and finally add the shredded coconut.
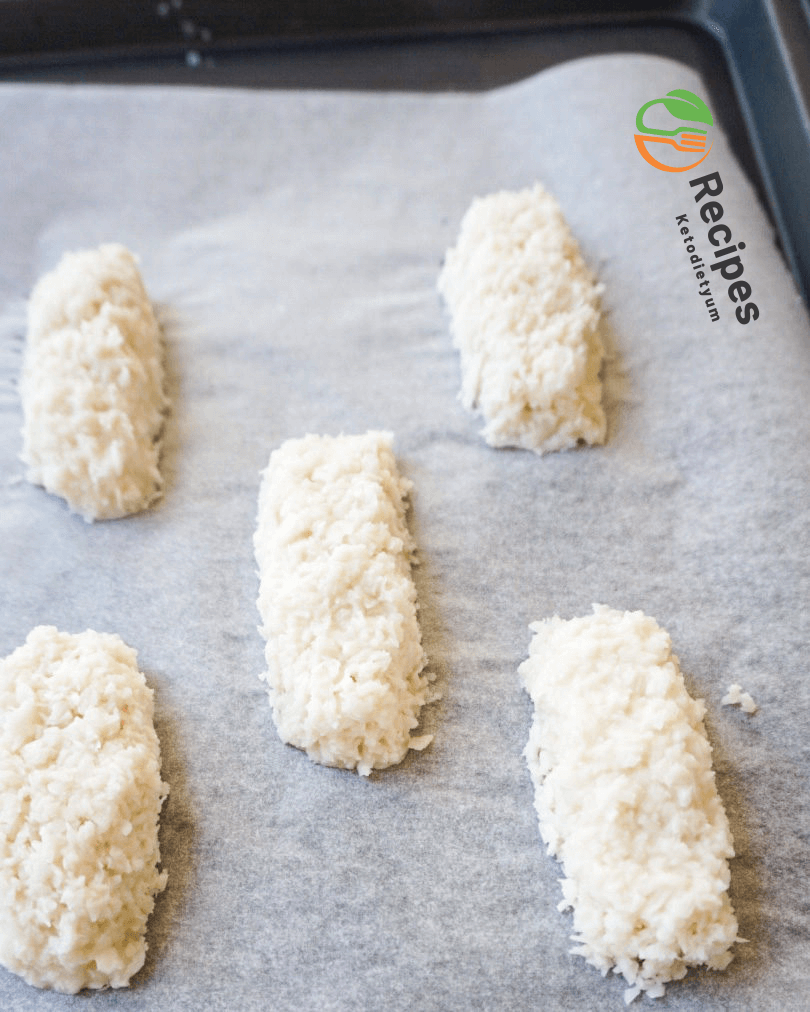
Form bars from the filling
I form bars out of small amounts of filling with my hands. I place them on a baking tray and slide it in the freezer for 20-25 minutes so they firm up.
The chocolate coating:
In the meantime prepare the chocolate. You can go 2 ways here:
- Melt chocolate of choice au bain marie (in a double broiler). You can add some coconut oil to make it runnier (optional)
- Or combine coconut oil, cacao powder and maple syrup by whisking it all together.
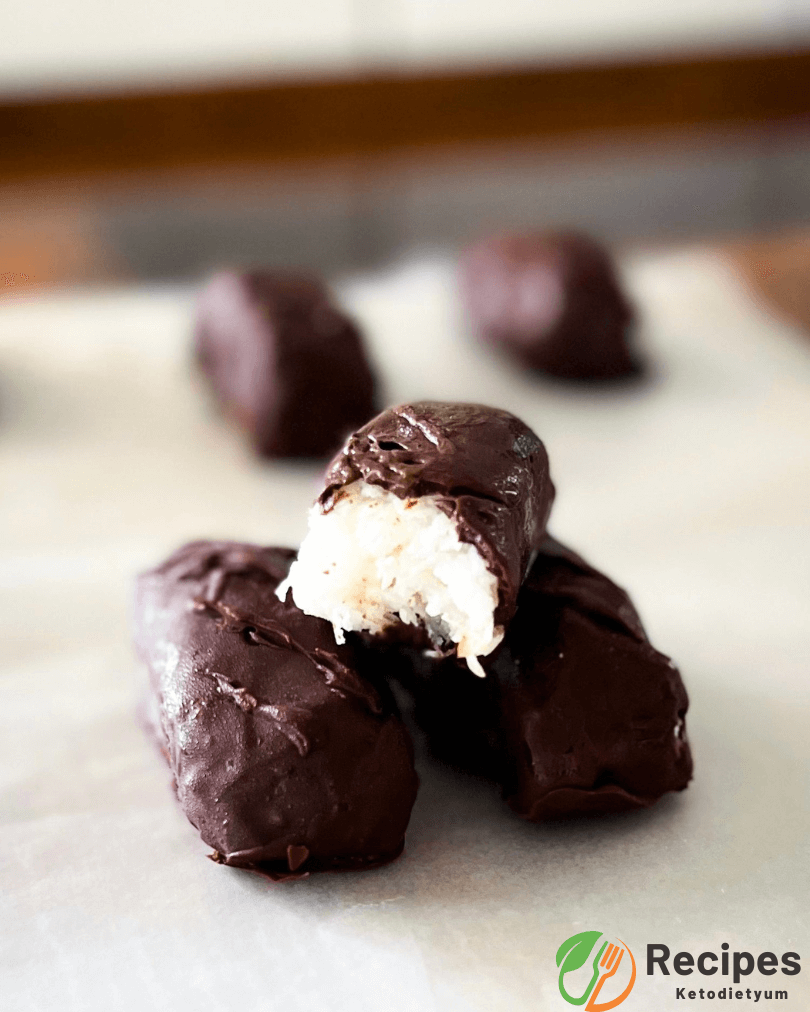
Cover the coconut bars with chocolate
I take the coconut bars out of the freezer. They should be hard enough to pick up without falling apart. I dip a bar in chocolate by placing it on a fork and submerge it in chocolate. I let the chocolate dipped bar drip out a bit before placing it back on the baking tray. The chocolate will harden straight away, because the filling is frozen. But to be sure, let them sit for 10 minutes before serving. Where I live it is always hot, so I actually place them back in the freezer for 10 minutes.
Double chocolate coating
For an extra crunch and thick layer of chocolate on these healthy Bounty bars, I dip them in chocolate a second time. After having covered them in chocolate the first time, I place them in the freezer for another 10 minutes. Now I dip them in chocolate again. Or instead, I drizzle with chocolate for a fancy swirl effect.
I usually make a whole stack and store them (in the freezer) so I always have them on hand. Bounty Bars Recipe
I make these healthy Bounty bars in a few different ways: as bars, mini bites (my kids’ favorite!), and even deconstructed as chocolate bark with shredded coconut and chopped almonds. Our whole family is hooked on them, and I’m sure you’ll love them too! They’re

Bounty Bars Recipe
Course: SidesCuisine: American4
servings1
hour1
hour270
kcal2
hoursThese Homemade Bounty bars are crazy easy to make, and you only need 3 ingredients! Just follow my simple steps, and you’ll be whipping up this favorite candy bar right at home!
Ingredients
3 cups unsweetened shredded coconut
1 cup sweetened condensed milk
15 oz semisweet chocolate
Directions
- In a medium bowl, mix coconut and sweetened condensed milk to make a thick and sticky paste.


- Use your hands to shape the paste into rectangles, pressing firmly so they hold together. After making 3 or 4, rinse your hands and leave them a bit damp—this keeps the paste from sticking.

- Place the coconut bars on a parchment-lined baking sheet and pop them in the freezer for about 20 minutes. This makes dipping them in chocolate way easier—don’t skip this step, or things will get messy!

- In the meantime, cut the chocolate into pieces and put ⅔ of it in a microwave safe bowl.

- Microwave the chocolate on medium power for 30 seconds, stir, then repeat in 15 seconds intervals, until the chocolate has melted completely.
If you prefer to melt chocolate on the stove top, place a heatproof bowl over a small saucepan filled with simmering water. On low heat, stir chocolate until melted, ensuring the chocolate does not make contact with water and steam whilst melting.
- Add ⅓ remaining chocolate and keep stirring until it is fully melted.

- This process is called tempering chocolate. It will allow the chocolate to have a glossy texture and to set correctly with a nice snap when you break it.
- It’s time for dipping now! Remove rectangles from the freezer. If you want to take your time, you can work with one rectangle at a time and leave the others in the freezer. Using two forks, dip one rectangle halfway into melted chocolate.

- And roll it to cover all sides.

- Using one fork, remove the rectangle from the melted chocolate. With the other fork, remove excess chocolate and arrange your homemade bounty on a lined baking sheet.

- Allow a few hours for the chocolate cover to set (time will vary according to where you live, how warm is your house etc.) and ENJOY your homemade bounty bars!
Notes
- They’ll stay fresh for up to 5 days in an airtight container, away from direct sunlight. After that, they’ll start to dry out.
- You can store them in the fridge, but they’ll dry out faster and harden a bit—so it’s not the best option.
Nutrition Facts
4 servings per container
- Amount Per ServingCalories270
- % Daily Value *
- Total Fat
30g
47%
- Saturated Fat 22g 111%
- Cholesterol 10mg 4%
- Sodium 44mg 2%
- Potassium 421mg 13%
- Total Carbohydrate
37g
13%
- Dietary Fiber 6g 24%
- Sugars 28g
- Protein 5g 10%
- Vitamin C 1%
- Calcium 10%
- Iron 3%
* The % Daily Value tells you how much a nutrient in a serving of food contributes to a daily diet. 2,000 calories a day is used for general nutrition advice.